On-Premise MySQL Migration to Amazon RDS (MySQL) using AWS DMS
I'm AWS Certified Solution Architect. I do write about the AWS Cloud Operation, Migration, Security and Automations.
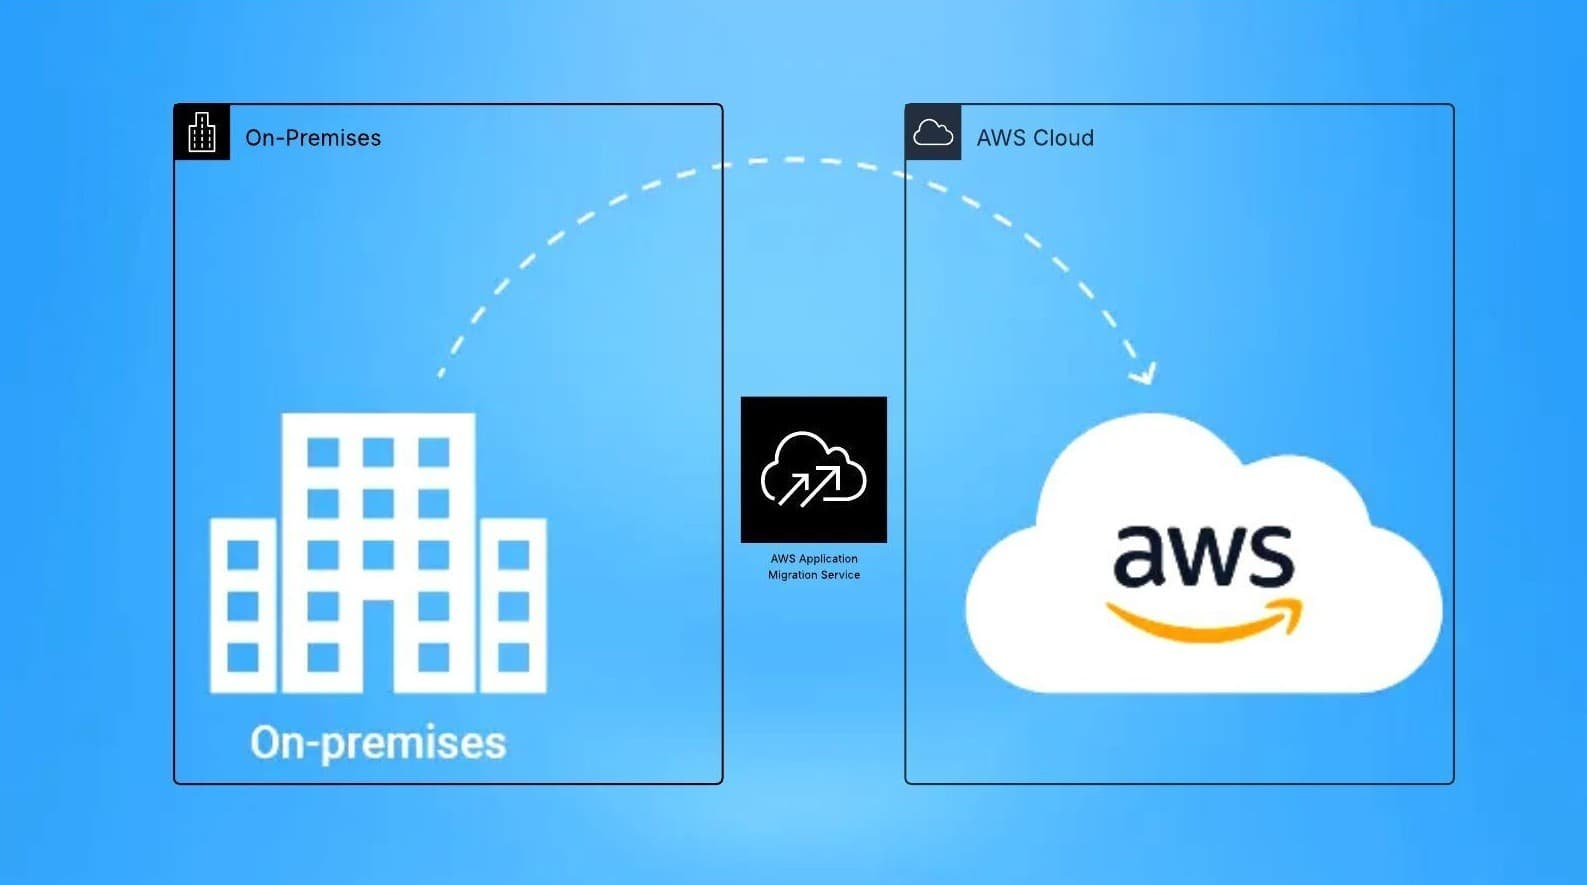
Migrating your on-premises MySQL database to Amazon RDS for MySQL with AWS Database Migration Service (DMS) is a common way to move to a managed, highly available database while keeping zero downtime or minimal. In this blog, I’ll show how you can migrate your databases to the AWS Managed Database.
Architecture:

Assumptions & prerequisites
Network connectivity between AWS and on-prem (VPN / Public IP available).
Administrative access to source MySQL and to the AWS account (permissions to create RDS, DMS, IAM, roles, subnets, and security groups).
Step-by-step migration procedure:
Step 1: Assess & plan
Decide migration type: Full load + ongoing replication (CDC) is recommended for production to reduce downtime.
- Configure MySQL for DMS (Binary Logs + Remote Access)
Edit the MySQL configuration file (/etc/mysql/mysql.conf.d/mysqld.cnf on Ubuntu/Debian, or /etc/my.cnf on RHEL/CentOS/Amazon Linux).
bind-address = 0.0.0.0
# AWS DMS timeout configuration
net_read_timeout=300
net_write_timeout=300
wait_timeout=300
Save and restart MySQL:
sudo systemctl restart mysql
Step 2: Create a dedicated DMS user and grant privileges
CREATE USER 'dms_user'@'%' IDENTIFIED BY 'StrongPassword!';
GRANT REPLICATION SLAVE, REPLICATION CLIENT ON *.* TO 'dms_user'@'%';
GRANT SELECT, INSERT, UPDATE, DELETE, CREATE, INDEX ON `abi_db`.* TO 'dms_user'@'%';
GRANT ALL PRIVILEGES ON awsdms_control.* TO 'dms_user'@'%';
FLUSH PRIVILEGES;
Step 3: Create IAM Roles for AWS DMS
Create the following roles in IAM → Roles → Create role → AWS Service → DMS and attach the matching AWS managed policies:
dms-cloudwatch-logs-role → attach AmazonDMSCloudWatchLogsRole
dms-vpc-role → attach AmazonDMSVPCManagementRole
DMSS3AccessRole-maxdms-migration-bucket → attach AmazonS3FullAccess (or custom bucket policy for least privilege)
NOTE: All roles must trust dms.amazonaws.com
Step 4: Create the target: Amazon RDS for MySQL
In the AWS Console → RDS → Create database. Choose MySQL, pick engine version compatible with your application

Choose instance class, storage, Multi-AZ (recommended for production), and set backups & maintenance.

Create or use a DB subnet group inside the VPC where your DMS replication instance will run.
Note the RDS endpoint, username, and password — you’ll use these for the DMS target endpoint.


Step 5: Networking: ensure connectivity
Decide how DMS will reach on-prem:
Recommended (secure): AWS VPN / Direct Connect.
Alternative: Open source MySQL port from DMS replication instance public IP range (less secure).
Make sure:Security groups for RDS allow inbound from the replication instance.
On-prem firewall allows inbound from replication instance or through your VPN.
If using public endpoints, consider enabling SSL for MySQL connections
Step 6: Create an AWS DMS replication instance
Search for AWS DMS in the management console, select Replication instances and click on Create replication instance.
Choose instance class and storage. For large databases or heavy throughput pick a larger instance.
Place the instance in the same VPC and subnets that can reach both on-prem (via VPN) and the RDS target.
Wait for the instance to become available.


Step 7: Create source & target endpoints in DMS
Source endpoint (MySQL):
Engine: MySQL.
Hostname: your on-prem IP or hostname reachable by the replication instance.
Port: 3306 (or custom).
Username/password: the
dms_useryou created.Test the endpoint connection from the replication instance (there’s a “Test endpoint connection” button).


Similarly,
Target endpoint (RDS MySQL):
Engine: MySQL.
Hostname: RDS endpoint.
Port: 3306.
Username/password: RDS master user (or another user with sufficient privileges).
Test the endpoint.


If the endpoint tests fail, check security group rules, network ACLs, and firewall rules.
Step 8: Create and configure the migration task
Search for DMS in the console, Select Database migration tasks and click on Create task.

Choose:
Replication instance
Source endpoint
Target endpoint
Migration type: Migrate existing data and replicate ongoing changes (Full load + CDC).
- Table mappings: choose to migrate entire schemas or select tables. You can use JSON mapping to include/exclude objects.
Task settings:


Choose how to handle target table prep (e.g., Do nothing or Drop tables and recreate).
For large LOBs, select appropriate LOB mode (e.g., Full LOB mode).
Tune commit rate and parallel load options if needed.
Start the task (choose Start task on create or start after creation).

Step 9: Monitor the migration

In DMS Console:
Watch task status and replication instance CPU, memory, and disk I/O.
Check Table statistics for rows loaded per table
Conclusion
Using AWS DMS to migrate on-prem MySQL to Amazon RDS lets you move with minimal downtime when planned and executed carefully.